后端如何接收表单数据
上一章介绍了控制器和视图数据的交互操作。这一节课我们深入讲解前端传输数据时,对复杂的数据进行深入的绑定操作。
没有模型绑定前
为了方便大家更深入的理解模型绑定, 我们先来看看使用Request方法接收参数。
创建一个UserController.cs控制器,代码如下:
using System;
using System.Collections.Generic;
using System.Linq;
using System.Web;
using System.Web.Mvc;

namespace FirstProject.Controllers
{
    public class UserController : Controller
    {
        // GET: User
        public ActionResult Index()
        {
            return View();
        }

        //添加用户信息的功能
        [HttpPost]
        public ActionResult Create()
        {
            //因为是post方法请求过来的,所以使用post方法接收
            string username = Request.Form["username"]; //Request.Form 方法只能接收post数据,不能接收get数据
            string pwd = Request["pwd"]; //这样写,post和get数据都可以获取
            string id = Request.QueryString["id"];//注意,这样写只能取到路径的参数,取不到post表单中的值
            string age = Request.Form["age"];
            string name = Request.Form["name"];
            return Content(username + "-" + pwd + "-" + id + "-" + age + "-" + name);
        }
    }
}
对应控制器方法的视图Index.cshtml,代码如下:
@{
    ViewBag.Title = "Index";
}

<h2>添加用户</h2>

<form action="/User/Create?id=1000" method="post">
    <p>
        用户名: <input type="text" name="username" value="" />
    </p>
    <p>
        密码: <input type="password" name="pwd" value="" />
    </p>
    <p>
        名字: <input type="text" name="name" value="" />
    </p>
    <p>
        年龄: <input type="text" name="age" value="" />
    </p>
    <input type="submit" value="保存" />
</form>
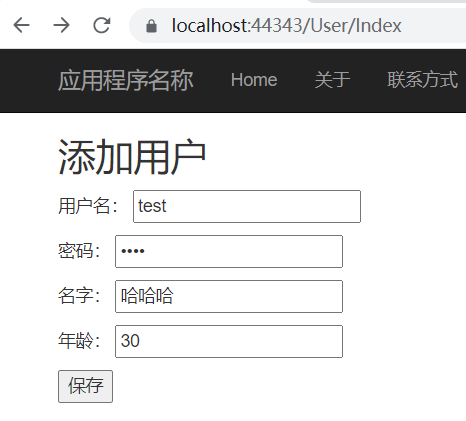
运行后的效果:

点击提交得到如下结果:

通过上面的案例,会发现使用Request接收参数特别麻烦,写的代码特别多,这样实现功能特别繁琐,有什么办法可以优化呢?可以使用模型绑定解决这个问题!接下来我们正式学习模型绑定!
模型绑定
将浏览器发送的HTTP请求数据转换为.NET对象的过程。
模型绑定使得在控制器中可以直接获取视图、或URL传递来的数据,且这些数据可以自动转换为模型对象,以便调用。
模型绑定机制省略了常见的Request.Form和Request.QueryString手动传值和类型转换的步骤,这样可以专注地处理模型对象。
使用示例,我们对前面的代码完善如下:
Index.cshtml代码:
@{
    ViewBag.Title = "Index";
}

<h2>添加用户</h2>

<form action="/User/Create?id=1000" method="post">
    <p>
        用户名: <input type="text" name="username" value="" />
    </p>
    <p>
        密码: <input type="password" name="pwd" value="" />
    </p>
    <p>
        名字: <input type="text" name="name" value="" />
    </p>
    <p>
        年龄: <input type="text" name="age" value="" />
    </p>
    <input type="submit" value="保存" />
</form>
UserController.cs代码如下:
//添加用户信息的功能
[HttpPost]
public ActionResult Create(string username,string pwd,int id,int age,string name)
{
    return Content(username + "-" + pwd + "-" + id + "-" + age + "-" + name);
}运行后效果一致,在这里不做赘述。具体的代码区别大家会发现这样写是不是简单多了,通过方法名接收请求过来的参数,自动赋值特别简单易用是吧!
隐式模型绑定
以上模型绑定也称为“隐式模型绑定”,由默认模型绑定器DefaultModelBinder类自动实现。
DefaultModelBinder类通过4种途径获取绑定的值,其顺序如下:
Request.Form:获取表单提交的值
RouteData.Values:获取路由的值
Request.QueryString:获取URL的值
Request.Files:获取上传文件
1、修改后的控制器包含两个版本的Index操作方法,无参数的Index方法支持浏览(HTTP GET),带参数的Index方法支持提交(HTTP POST),所以加上[HttpPost]特性。
2、默认的模型绑定需要遵守相关约定。在视图中,表单控件的name属性和模型对象属性的名称必须相同,否则无法完成绑定
学习完本节课,做一下作业吧~
作业:使用模型绑定的方式,接收注册传送过来的数据。

毕设系统定制、课程教学、问题1对1远程解答,可联系村长QQ:330168885
需要购买本课才能留言哦~